We are excited to announce the release of QuickBooks Online (QBO) 4e – the latest edition packed with enhanced features and improved functionalities! QBO 4e offers a more comprehensive and up-to-date learning experience. It ensures that you have access to the latest tools and features that QuickBooks Online has to offer. By upgrading to QBO 4e, you'll stay ahead of the curve and have the latest updates posted to QBO 4e Updates and QBO 4e Videos webpages.

QBO 3e UPDATES
We like to get it right the first time, but sometimes things change or we need to tweak something. So we will post it here for you.
Since QBO is updated on an ongoing basis, updates to QBO may result in differences between the new QBO changes and some of the screen captures and instructions in your text. If it is a major update, we will post an update here to assist you. Note that some updates may relate to specific instructions in your QBO 3e text while other updates relate to changes in the QBO application itself.
Your QBO screens may reflect the following QBO updates.
QBO CERTIFICATION EXAM UPDATE
For 2023, Intuit has rolled out a major update to the QBO Accountant Certification Exam Training and Portal. Click here for updated QBO Accountant Certification Exam instructions. [Update 2022.12.18]
QBO FORMS FREEZING
When you attempt to open a QBO form, such as an Expense form, if it freezes on your screen and you are unable to see the entire form, try refreshing your browser to reload and view the entire form.
QBO SETUP UPDATE — MAY AFFECT SECTION 1.1 and SECTION 11.2
QBO continues to roll out updates to various sectors are various times. Sometimes the updates are rolled out for testing and feedback only. Your QBO Setup screens may vary from your text. For your convenience, posted here is one of the Setup updates that some QBO users are seeing. [Update 2023.01.23]
QBO INVOICE FORMAT PROTOTYPE UPDATE — MAY AFFECT CHAPTERS 3 5 7 11
QBO is rolling out a new Invoice format. Since the rollout is accomplished in sectors, instead of all at one time, the changed Invoice format may appear at different times for different QBO users. Note that this new Invoice form is a prototype so expect to see ongoing changes.
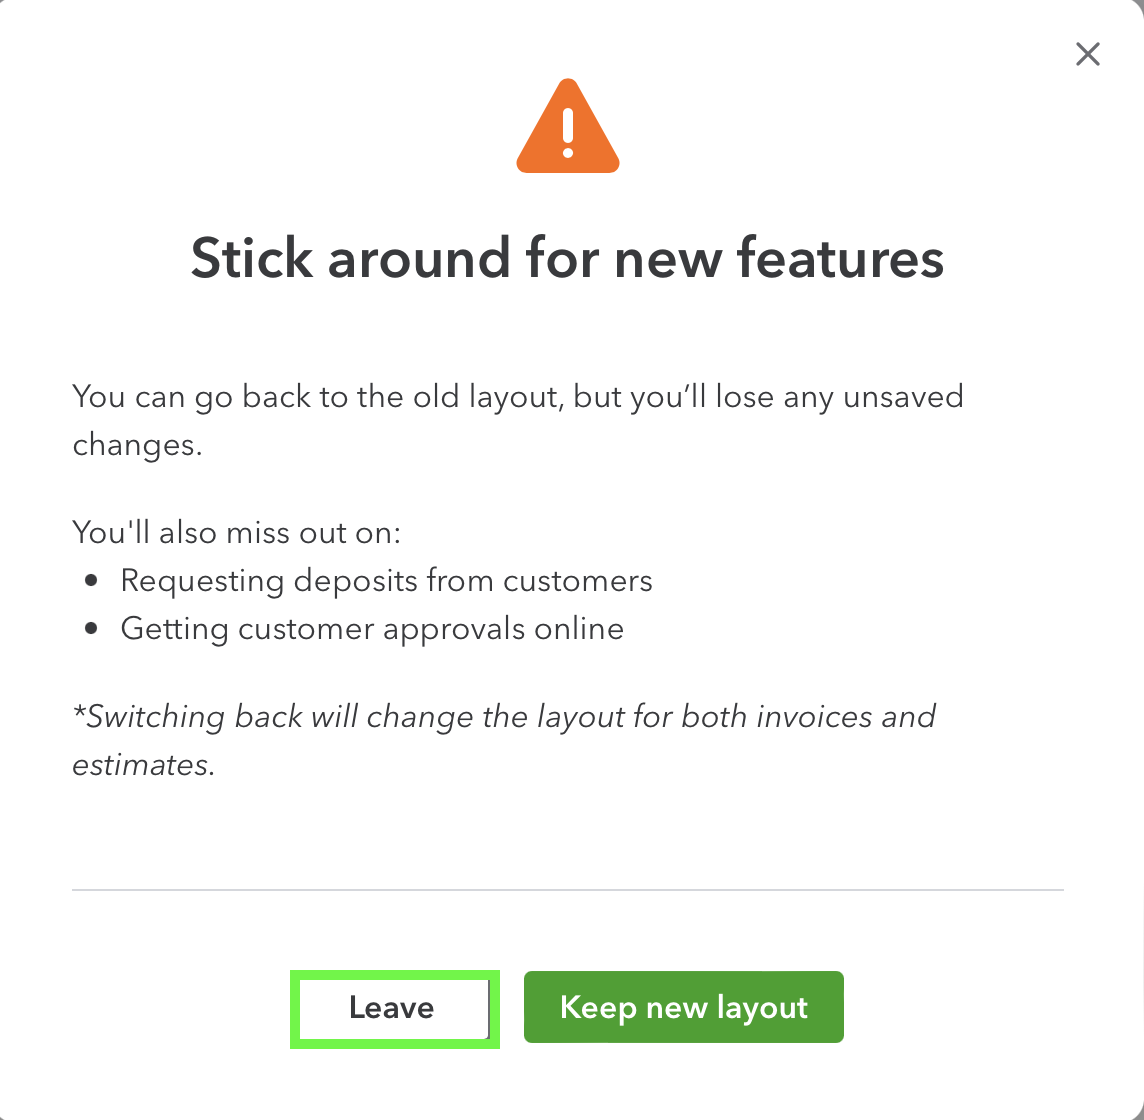
When you select the + New > Invoice instructions in your text, if the New Invoice Format appears on your QBO screen, complete the following steps to access the prior Invoice format that is consistent with the Invoice screen captures in your text.
(+) New > Invoice to display the invoice.
If the new Invoice format appears, select Old layout in the upper right corner of the Invoice window.
Select Leave to go to the prior Invoice format. [Update 2023.01.13]
Note: if you prefer to try the new Invoice format click here to view a video or click here to test drive the new QBO invoicing experience. [Update 2023.02.16]

CHAPTER 1
Chapter 1 Page 9 Step 19. Your Screen may appear slightly different than the screen shown in your text. If needed, select: No, I don’t want to add payroll. [Update 2022.06.23][Update ebook 2022.07.27]
Chapter 1 Page 9 Step 21. Select "I don't use any apps" may now display as Skip for Now. [Update 2022.04.21][Update ebook 2022.07.27]
Chapter 1 Page 10 Step 24. "Track receipts and bills" may now display as Track receipts and expenses. [Update 2022.04.21][Update ebook 2022.07.27]
Chapter 1 Page 10 Step 24. "Add sales" may now display as Track sales or Manage sales tax and track sales. [Update 2022.04.21][Update ebook 2022.07.27]
Chapter 1 Page 16. If your screen shows Money In and Out, select that option. [Update 2022.06.27][Update ebook 2022.07.27]
Chapter 1 Page 54. Add: Step 10: Select Done. [Update 2022.04.21][Update ebook 2022.07.27]
Chapter 1 EM1.3 Item 2. Update to: Change the setting for Track expenses and items by customer to On. [Update 2022.04.21][Update ebook 2022.07.27]
Chapter 1 EM1.3 Item 6. Update to: If needed, change the setting for Use purchase orders to On. [Update 2022.04.21][Update ebook 2022.07.27]
Chapter 1 EM1.4 Items 9 and 10. Omit items 9 and 10 because a QBO update has eliminated these selections. [Update 2022.06.23][Update ebook 2022.07.27]
Chapter 1 Page 75 E1.7 Register, 2nd paragraph: From the Navigation Bar select "Accounting > View Register" may now display as Accounting > Chart of Accounts > View Register. [Update 2022.04.21, 2022.04.20][Update ebook 2022.07.27]
CHAPTER 2
Chapter 2 Page 86 Step 1. Undeposited Funds account title may now appear as Payment to Deposit. [Update 2022.04.21][Update ebook 2022.07.27]
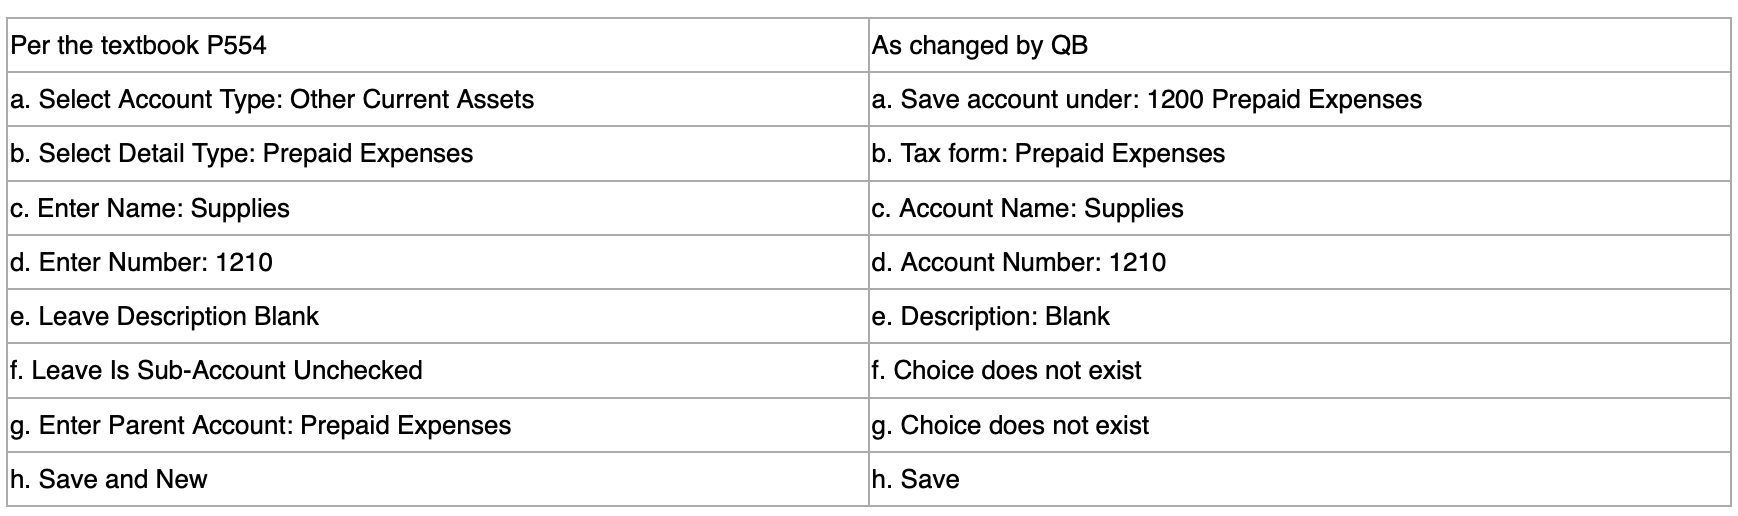
Chapter 2 Page 94 and 95. QBO Add New Accounts windows may appear differently on your screen than in the text. Add New Accounts windows have changed. Select the Account Type from the selection of icons at the top of the screen. The Sub-Account selection may have changed and appear as the option: Save Account Under > select from the drop-down menu of accounts. See below for an example.

[Update 2022.06.23]
Chapter 2 Page 96 Step 2. After the QBO update to adding new accounts and subaccounts, to add Water and Sewer account as a subaccount to Utilities, be sure to select Account Type: Utilities (the parent account). Also, note that based on a QBO update, a Water and Sewer subaccount may automatically appear in your Chart of Accounts. [2022.07.19]
Chapter 2 Page 99 Step 1. …select the drop-down arrow next to Run Report… may now appear as: next to View Register. [Update 2022.04.21][Update ebook 2022.07.27]
Chapter 2 Page 109 Q2.10 Item b. if your screen shows View Register instead of Run Report, then Item b should be: Display the Chart of Accounts, then select View Register drop-down arrow, select Make Inactive. [Update 2022.04.21][Update ebook 2022.07.27]
Chapter 2 Page 111 EM2.1. Note that your COA may differ from the accounts listed in EM2.1. Select the QBO Account Type for the accounts listed in EM2.1. [Update 2022.04.21][Update ebook 2022.07.27]
Chapter 2 Page 113 EM2.3 Step 4b. Due to a QBO update, the 1600 Undeposited Funds account may now appear as 1600 Payments to Deposit. [Update 2022.07.19]
Chapter 2 Page 118 EM2.6 Step 1. Due to QBO updates, the COA many now autopopulate with a Supplies Expense account. To add the requested Supplies (Asset) account as a subaccount to Prepaid Expenses:
a. From the COA, select New (account), select Save account under: Prepaid Expenses
b. Select Tax form section: Other Current Assets
c. Enter Account name: Supplies
d. Enter Number: 1210
e. Select Save
[Update 2022.09.13, 2022.07.20]
Chapter 2 Page 118 EM2.6 Step 2. Due to QBO updates, to add Subaccount: Prepaid Expenses: Insurance complete the following:
2.a. From the COA, select New (account), select Save account under: Prepaid Expenses
b. Select Tax form section: ________
c. Enter Account name: Insurance
d. Enter Number: 1220
e. Select Save
Note: If you receive an error message when attempting to add the above Prepaid Expenses: Insurance account, try editing the 5010 Insurance account name to: 5010 Insurance Expense.
[Update 2022.09.13]
Chapter 2 Page 118 EM2.6 Step 3. Due to QBO updates, to add Subaccount: Prepaid Expenses: Rent complete the following:
3.a. From the COA, select New (account), select Save account under: Prepaid Expenses
b. Select Tax form section: ________
c. Enter Account name: Rent
d. Enter Number: 1230
e. Select Save
[Update 2022.09.13]
CHAPTER 3
Chapter 3 Page 138 Step 3. If Add an Item in the Start adding Products and services screen does not permit you to add an item, try opening an invoice and adding the item in the invoice form. [Update 2022.05.06][Update ebook 2022.07.27]
Chapter 3 Page 181 EM3.10. 1.a. To add Kuno as a sub-customer, select New Customer. Enter First Name: Kuno. Select: Is a sub-customer. Select Parent Customer: Angel Merriman. Select Bill Parent Customer > Save. [Update 2022.09.08]
Chapter 3 Page 182 EM3.12. For clarity, the second paragraph, first sentence refers to Evan Henry as the contractor who provided the pet care services for both Kuno and Remy. The pet care services include both categories of Pet Care and Pet Wellness services. [Update 2022.05.06][Update ebook 2022.07.27]
CHAPTER 4
Chapter 4 Page 224 EM4.6 Step 2 a and b. If your screen does not contain the drop-down menu option, Upload from file, use the following instructions:
Skip Steps 2a and b
Select Gear icon > Import Data > Banking Data
Continue with Step 2c
Chapter 4 Page 225 EM4.7 Step 2 an and b. If your screen does not contain the drop-down menu option, Upload from file, use the following instructions:
Skip Steps 2a and b.
Select Gear icon > Import Data > Banking Data
Continue with Step 2c
[Update 2023.09.12, special thanks to Steve Carter of Lone Star College]
CHAPTER 5
Chapter 5 Page 279 E5.3. The second item under Invoice Workflow Activities should be: Invoice (instead of Sales Receipt). [Update 2022.05.06][Update ebook 2022.07.27]
CHAPTER 6
Chapter 6 Page 295 Step 4. The Vendor Form may appear differently than the one in your text. The Vendor Form may be updated to show the Company name field before First Name and Last Name fields. [Update 2022.05.23][Update ebook 2022.07.27]
Chapter 6 Page 297 Step 4. Your New Name Vendor form may not display Details. Instead, the Vendor Form may automatically display detail fields. [Update 2022.05.23][Update ebook 2022.07.27]
Chapter 6 Page 305 Step 12. Replace Accounting with Equipment Rental. [Update 2022.09.21]
Chapter 6 Page 317 EM6.6 Exercise heading should be: EM6.6 Expense Credit Card [Update 2022.09.30]
CHAPTER 7
Chapter 7 Page 345 Step 4. Payment Date should be: 01/10/2023. [Update 2022.10.04]
Chapter 7 Page 364 Step h. Check the Tax box for the line item. [Update 2022.06.27][Update ebook 2022.07.27]
CHAPTER 8
Chapter 8 Page 374. Note: Due to QBO Updates how to add an employee has changed. To add an employee:
From the Navigation Bar, select Payroll
Select Employees tab
After Want to track employees but don’t need payroll yet?, select Add an employee
When asked, Need to pay employees?, select Not right now
When the Employee form appears, enter employee information using your text instructions
[Update 2022.10.13]
Chapter 8 Page 391. Note that QBO Time Tracking has been updated.
First, turn on time tracking for Contractors:
Select (+) New icon
From the Employees column, select Time Entry. Note:. With the QBO update at this time, you can also access time entry by selecting Time from the Navigation Bar > Time entries tab > select Check out pricing > scroll to the bottom of the screen and select Use basic time tracking (included in your current plan). Then you can select Add time to enter time. You can also view tracked time from the Time entries tab. Keep in mind there are frequent and ongoing updates to QBO payroll and time tracking, so this may change.
In the Add time form, select the Gear icon
Select Choose Who Tracks Time
Select the Edit pencil for Show Contractors
Toggle Show Contractors to On
Select Save
Verify that Show Contractors setting is now On and that your contractors are now displayed in the Choose who tracks time form. Select Save changes.
Select Back to return to the Add time form
Second, to enter time for time tracking:
Select (+) New icon > Time Entry
Select Your Name
Select Custom from the drop-down menu. Then use the calendar to select Date: 01/05/2024.
Select Add Work Details
Unselect Enter Start and End Times
Enter Duration: 1.00
Select Customer/Project: Sandy Copper: Remy
Select Service: Pet Care: Errand
Select Billable (/hr)
Select Done
Select the Save menu arrow, then select Save and close
[Update 2022.10.13]
Chapter 8 Page 393 Step 12. If your name does not appear, select Gear icon in the Add Time window > Choose Who Tracks Time: Show Contractors > select Pencil > Change to green: yes > Save > Save changes. [Update 2022.05.23, 2022.08.04][Update ebook 2022.07.27]
Chapter 8 Page 396 Step 4. If the drawer is not visible, select the < symbol just below the X on the top right of the window. [Update 2022.05.23][Update ebook 2022.07.27]
Chapter 8 Page 405 Step 2. Your QBO screen may not display a Payroll Tax tab. The screen captures in your text display how the Payroll Tax Center would normally appear. [Update 2022.05.23][Update ebook 2022.07.27]
Chapter 8 Page 415 EM8.5 2. Create Time Entry. After you enter 2a through 2c, if it is deleted when you complete step 2d, try this:
Complete steps 2d through 2p
Complete steps 2a through 2c
Make sure the Start/End Time button is not selected.
Enter duration (with the start/end times listed as steps
Select: Add Work Details (new window opens)
Select: Service: MTB App Development
Select Save
Complete steps 2q through 2v [Update 2022.05.23]
Chapter 8 Page 415 EM8.6 1. Create Time Entry. If steps 1b and 1c are deleted when you add a new service in step 1e, use the same approach as in EM8.5.2 above, adding the new service and then completing steps 1b through 1d. [Update 2022.05.23]
Chapter 8 Page 416 EM8.1 Step 1e. MTB App Development should be MTB Administrative Services. [Update 2022.10.17]
Chapter 8 Page 418 EM8.7 Step 1a. Due to a QBO update, if step 1a results in a green spinning wheel and does not proceed, select Payroll on the Navigation Bar > select Track Time (and deselect other options) > select Try Now. Then complete Step 1a. Select Sales > Customers tab > Angel Merriman > New Transaction menu > Time Activity. [Update 2022.06.29][Update ebook 2022.07.27]
Chapter 8 Pages 418-419 EM8.7f, EM8.8f, EM8.9f. Your QBO screen may appear differently than in the text. Billable (/hr) and $ may not appear or be necessary. [Update 2022.05.23][Update ebook 2022.07.27]
CHAPTER 9
Chapter 9 Page 447 Step 3. Account 5020 Interest Paid is a QBO default account in the COA. Technically, the account title should be Interest Expense instead of Interest Paid since Interest is being recorded as an Expense before it is paid in this case. [Update 2022.06.22][Update ebook 2022.07.27]
CHAPTER 10
Chapter 10 Page 493. Please ignore the screen capture showing Cost of Goods Sold of $711.00.
Chapter 10 Pages 503 - 504 Step 1. Should be Select (+) New icon. [Update 2022.04.20][Update ebook 2022.07.27]
Chapter 10 Page 520 Step 3. If the Money In tagging shows a $-0- balance, try running the Contractors report and then return to the Tags screen to view the Money In balance. [Update 2022.06.22][Update ebook 2022.07.27]
Chapter 10 Page 533 Step 6.c. Accounts Payable (A/P) Aging Summary Excel export s/b Sales by Product/Service Excel export [Update 2022.10.18]
CHAPTER 11
Chapter 11 Page 542 Step 18. If your screen shows Money In and Out, select that option. [Update 2022.07.10][Update ebook 2022.07.27]
Chapter 11 Page 542 Step 18. "Track receipts and bills" may now display as Track receipts and expenses or may no longer appear as an option. [Update 2022.10.27] [Update 2022.07.10][Update ebook 2022.07.27]
Chapter 11 Page 542 Step 18. Add Sales may appear as Track Sales. [Update 2022.06.22][Update ebook 2022.07.27]
Chapter 11 Page 542 Step 20. If your QBO screen does not display a Maybe Later option, select the No option instead. [Update 2022.07.08][Update ebook 2022.07.27]
Chapter 11 Page 550. QBO has changed the format for entering new accounts. If your COA does not display the account:
Select New
From the New Account window, select Assets from the icons at the top of the window (or appropriate category for subsequent new accounts)
Save Account under: Other Current Assets
Tax Form Section: Other Current Assets
Account Name: As appropriate
Select Save [Update 2022.06.22]
Chapter 11 Page 550. Account No 1600 Undeposited Funds account title may now appear as account Payment to Deposit. [Update 2022.07.08]
Chapter 11 Page 552. Add New Accounts windows in QBO may appear differently on your screen than in the text. See examples below.

[Update 2022.06.23]
Chapter 11 Page 554. QBO has changed how subaccounts are added. Instead of selecting Sub-Account in the New Account window, select Account Type drop-down menu and select the parent account from this list. After adding, the subaccount will then appear as indented under the Parent Account. See example below.
[Update 2022.06.23]
Chapter 11 Page 555 C11.3.5. Due to QBO changes in the Chart of Accounts, before creating your Chart of Accounts report in C11.3.5, update your QBO Chart of Accounts so it contains the following accounts. (Note that Undeposited Funds account may now be entitled Payment to Deposit.)
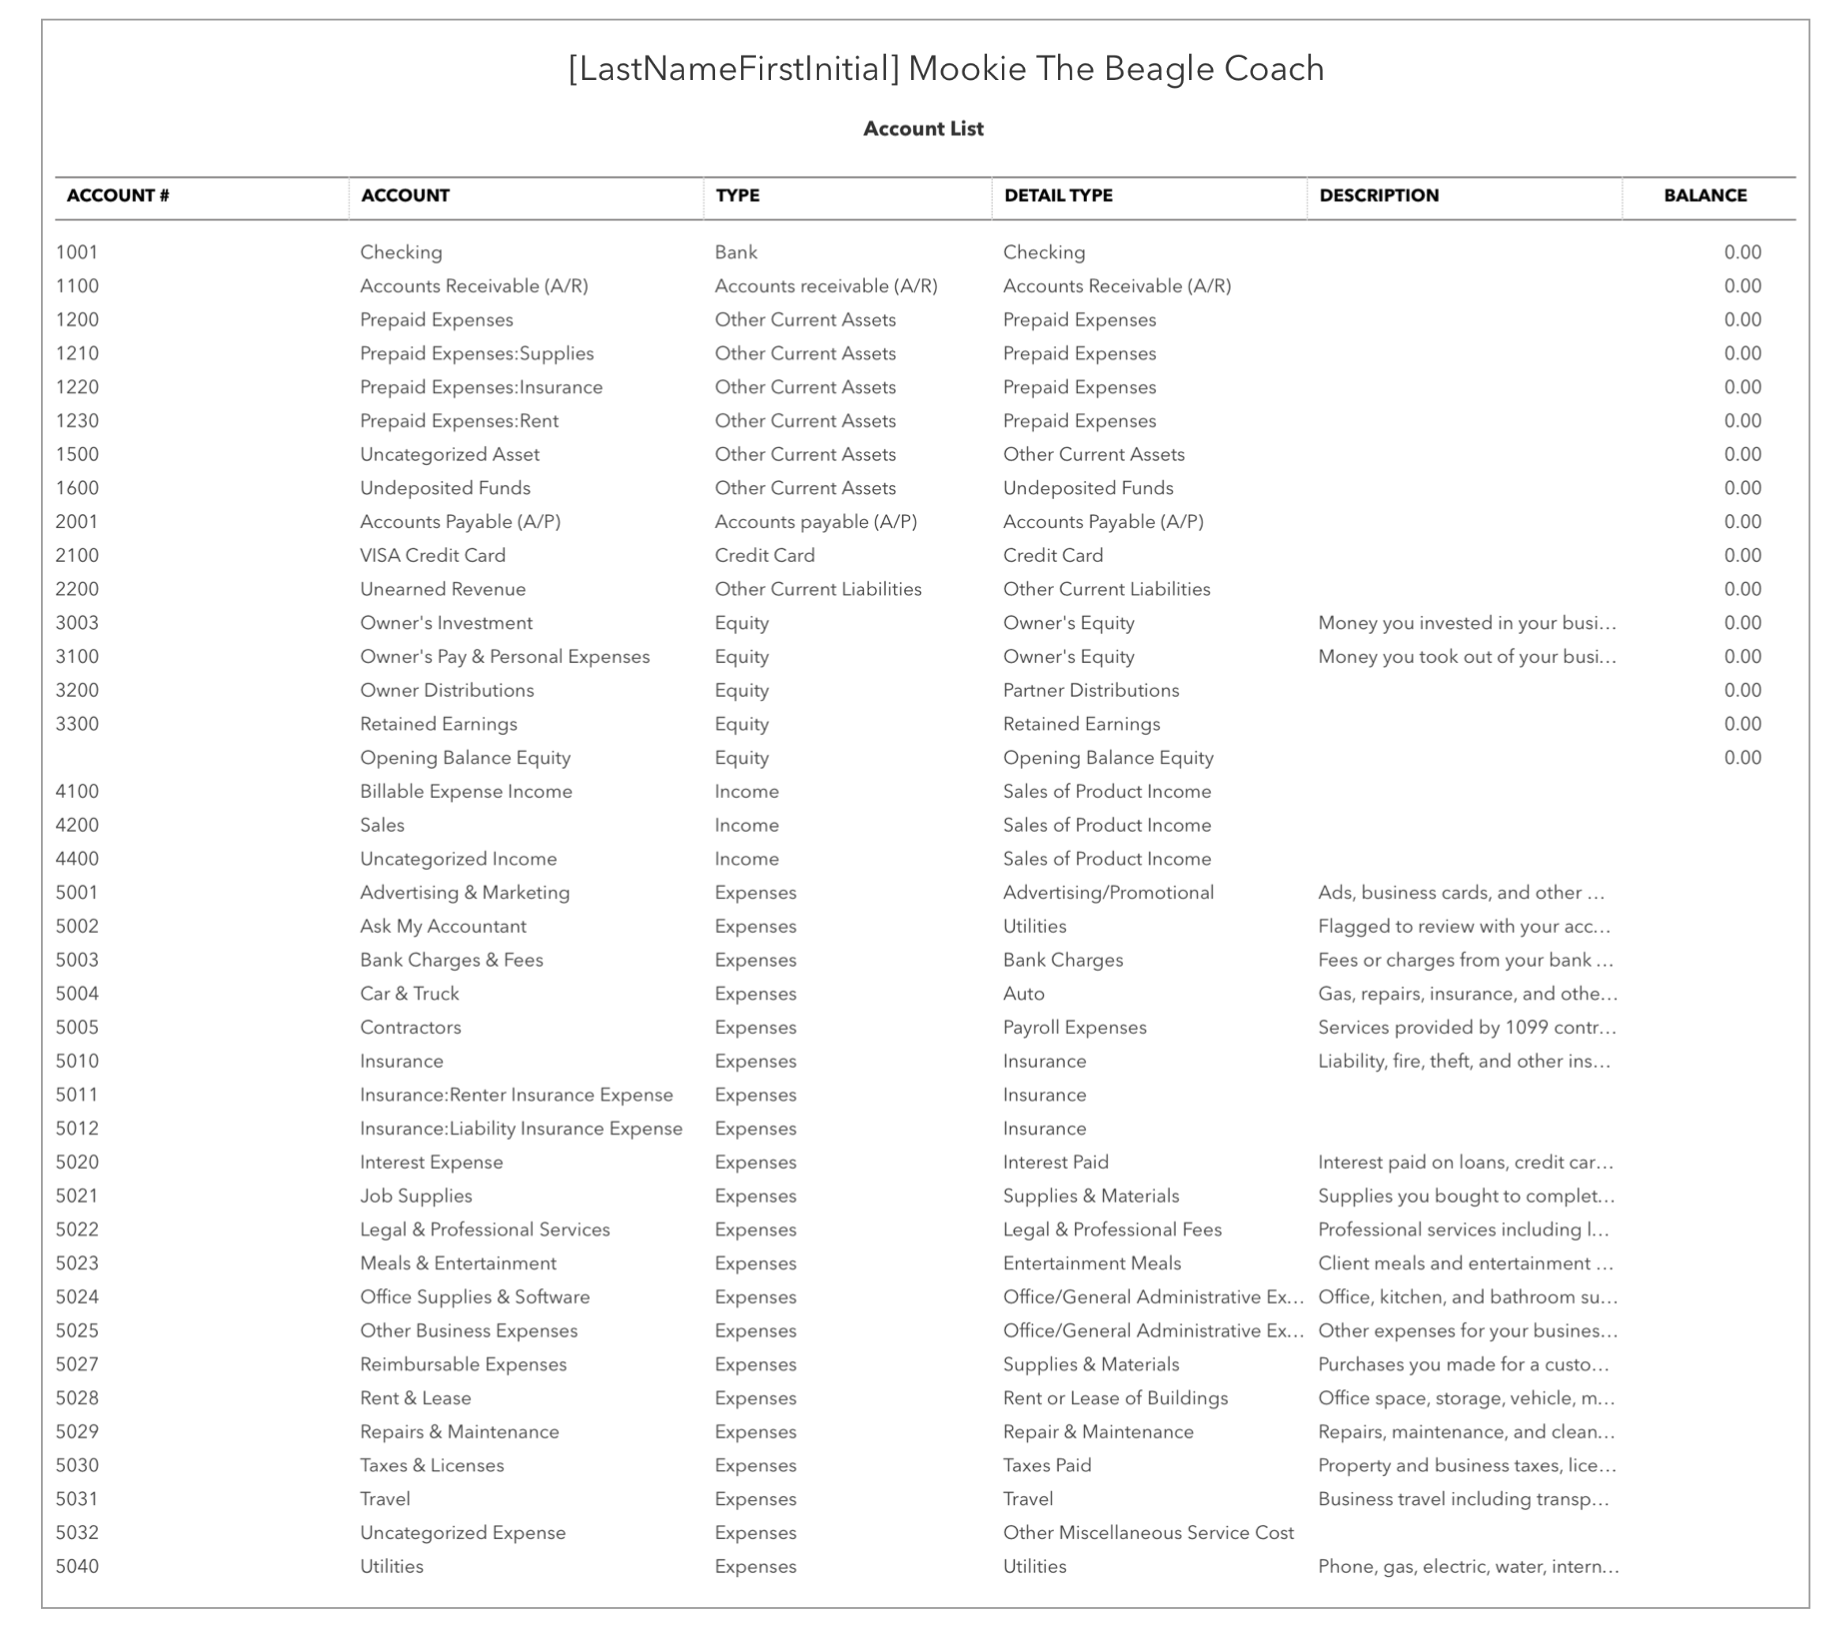
[Update 2022.07.10][Update ebook 2022.07.27]
Chapter 11 Page 556 C11.3.6 Item 13. Should be Prepaid Expenses: Rent [Update 2022.10.27]
Chapter 11 Page 561 C11.4.3 Item 1. Besides Hours and Sales services that QBO automatically enters, how many services are listed the MTB Coach Products and Services List? [Update 2022.10.27]
Chapter 11 Page 562 C11.4.4 Item 4. Should be Enter Cost of Goods Sold Account Number. [Updaate 2022.10.27]
Chapter 11 Page 562 C11.4.4 Item 5. Should be Enter Purchases Account Number. [Update 2022.10.27]
Chapter 11 Page 569 C11.8.1. Note that All customer invoices for pet coaching services are due upon receipt. Note that all pet and marketing tags are to be entered on Invoices. [Update 2022.10.27]
Chapter 11 Page 570 Step 4 02/02/2023. Replace with:
Purchase 4 Advanced Agility Training sets from Toronto LLC, terms net 30, for a wholesale price of $100.00 each to build 2 agility training courses indoors and 2 agility training courses outdoors in the leased facilities for onsite agility training services. Cy provides the labor to build out the agility training courses.
Since the agility training sets purchased will eventually be sold to customers, record the items as Inventory.
Enter as a Purchase Order. Then enter Bill and add Purchase Order to the Bill. [Update 2022.06.22][Update ebook 2022.07.27]
Chapter 11 Page 578 Section 11.8 C11.8.4 Transaction 3. Remember to add 9% sales tax to products sold. [2022.07.19]
Chapter 11 Page 578 and 579 Section 11.8 C11.8.4 Transaction 2,3,6. Weave Poles should be Weave Pole. Transaction 6. Tunnels should be Tunnel. [Update 2022.10.27]
Chapter 11 Page 593 Section 11.12 C11.12.2 Question 2. On the Sales by Product/Service Summary Report what is the percentage of sales generated by all Pet and Puppy Manners Training Services. [2022.07.10][Update ebook 2022.07.27]
Chapter 11 Page 597 Section 11.14. If Tag results do not appear in the Tags window, try running your Tag reports on page 598 and then return to the Tags window. [Update 2022.06.22][Update ebook 2022.07.27]
Chapter 11 Page 597 Section 11.14. Note: When entering tags for subsequent invoices for a repeat customer, be sure to enter the pet tag as well as the same marketing channel tag for the initial invoice. For example, on the 02/19/23 invoice to Sherry Byran, you should enter both the Pet Tag for Maggie as well as the Marketing Channel tag for Social Media Instagram just as you did on the 02/09/23 invoice. [Update 2022.07.07][Update ebook 2022.07.27]
QBO Updates
Redesigned Sales Tax Center. A new redesigned Sales Tax Center is slowly being introduced to new QuickBooks Online users. The changes are a redesign of the existing Sales Tax Center so your Sales Tax features may differ from what is shown in your text.
Redesigned Bank Match Pairing. Your QBO screens may display a newly redesigned bank match pairing. QBO may automatically pair downloaded bank transactions. However, it is always best to review the transactions to make sure they are paired correctly by QBO. You can select the transaction and then select unpair. Then complete your bank assignments as indicated in the text.
*Special thanks to Sara Barritt of Northeast Community College, Judy Dunaway of East Mississippi Community College, and Steve Carter of Lone Star College System, for assistance with tracking QBO updates.